


This post may contain affiliate ads at no cost to you. See my disclosures for more information.
As much as possible I strive to be a hands-on teacher to my children. So when we wanted to learn the parts of a flower, there was no better way to do it than to get our hands on actual flowers that we could dissect.
In this post I am sharing an activity in which we dissected a tulip in order to do some hands-on learning about the parts of a flower.
Note: For more botany lessons for kids of all ages, see my botany unit study page.
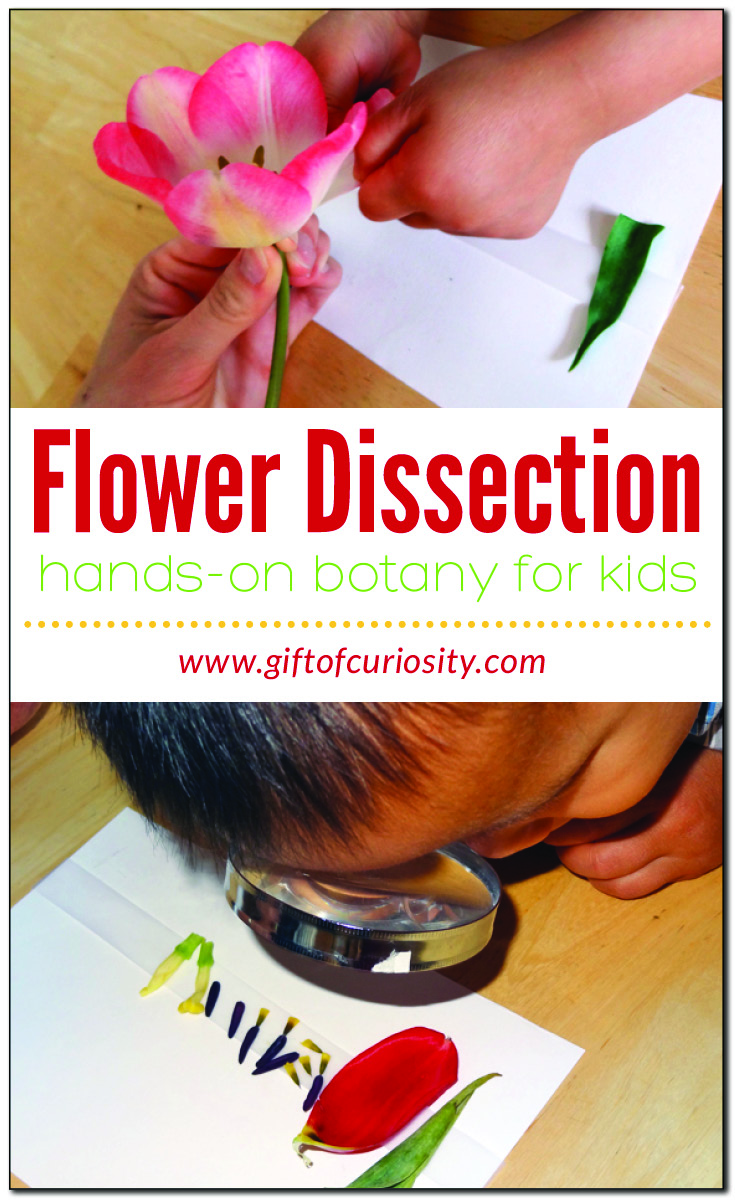
I purchased two tulips from our local florist one afternoon. (In hindsight I would have purchased gladiolas instead, as they would have been better for showing the various parts.)

Because Grandmum was a middle school science teacher, I invited her over to help with this lesson. She showed us a cool trick for displaying the parts of the flower.
I cut a piece of card stock in half. Then we cut a piece of tape longer than the card stock was wide. We secured one end of the tape to the table, then butted the card stock up against it. Next, we laid the tape – sticky side up – across the card stock and folded it under the other side. We then folded the tape down to stick the end to the table again. This resulted in a strip of tape – sticky side up – secured across the card stock.

Then each kid got a flower and we tore off the leaves and talked about what they were called.

Both of my children tore the top part of their leaf and secured it to their tape.

Then we took off the petals and looked at their properties and discussed their name.

The petals got added to the strip of tape right next to the leaf.

Once the petals were off, we had a very good view of the pistol and the stamen. One flower had yellow stamen and the other had stamen that were a deep purple color. The stamen are the “male” part of the flower since they contain the pollen. The pistol is the “female” part of the flower since it contains the eggs that get fertilized by the pollen.

The kids added the stamens to their strip of tape.

We noticed that a lot of pollen came off the yellow stamen and fell on to our table.

We talked about how the pollen needs to go down the pistol to reach the eggs. The kids touched the pistol to the stamens to simulate what needs to happen for the flowers to reproduce.

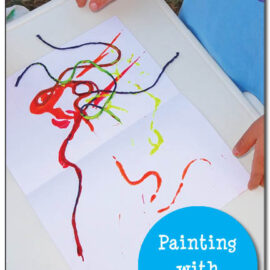
After all the flower parts were taped down, the kids used a magnifying glass to look more closely at the various parts.

Finally, we slipped the card stock out from under the tape and then put it down on top of the tape (so that the flower parts were between the tape and the card stock). Grandmum and I took the ends of the tape from the table and secured them to the card stock.

Then we turned the cards over, and voila! The kids had a lovely card with all their flower parts!

More botany resources for kids
More botany posts from Gift of Curiosity:
- Teaching kids where food comes from
- The basics about plants
- Dyeing flowers
- Vegetable people craft
- Sprouting seeds
- Do seeds need light to grow?
- How leaves breathe
- How leaves get water
- Why do leaves change colors?
- Gardening do-a-dot printables
- Leaf rubbings book
For more botany activities for kids of all ages, see my Botany Unit Study page and my Botany Pinterest Board.
Follow Katie @ Gift of Curiosity’s board Botany Unit Study on Pinterest.


Found you through Happy and Blessed Home Link Up. Love your idea for teaching botany. I’ve got two girls (3 and 1) that would love this project. They are “dissecting” flowers in our back yard all the time. It’s just that usually not ones I want them too! Thanks for sharing, happy to be a new follower. – Penny Lane @ Sisters Raising Sisters
Ha ha! I know what you mean about dissecting the flowers you *don’t* want them to touch! 🙂 Thanks for following along!
A lovely way to examine and learn about flowers.
What a really good idea – and to start with flower parts so young will really help them when it gets more complicated when they are older.
Thank you for linking up with Motivational Monday
Yes, my hope is to go more in depth regarding the various flower parts and names next time!
What a fabulous hands-on lesson! I love how they are discovering the parts of a flower while laying the framework for so many more lessons! Thanks for linking this up at Teach Me Tuesday on Preschool Powol Packets!
What a great lesson!! I love it! Thank you for sharing at Sharing Saturday!!
I love that this is a series and all the pollen you found.
That’s a great idea! My son loves looking through his magnifying glass. I’ll have to try that with him. Thanks!
I think this is one of the best botany lessons to do, such a great hands on tool.
So many wonderful things about this lesson — hands-on learning about a topic kids love, science exploration, fine motor skills, art, etc!! I have already pinned it and am so excited to try this both at home and in the classroom.
I hope your kids – both at home and in your classroom – have as much with this as we did. Thanks for featuring our activity on Stress-Free Sunday!
This is such a wonderful way to teach kids about the parts of a flower!! Thanks for linking to Share It Saturday. I featured your post this morning.
What a fun and interesting idea! Thank you for linking up to Mom’s Library, I’ll be featuring you this week.
Thank you very much for the amazing botany lesson.