This post may contain affiliate ads at no cost to you. See my disclosures for more information.
For me, Christmas and art go together like peanut butter and jelly. I just love creating crafts during the Christmas season!
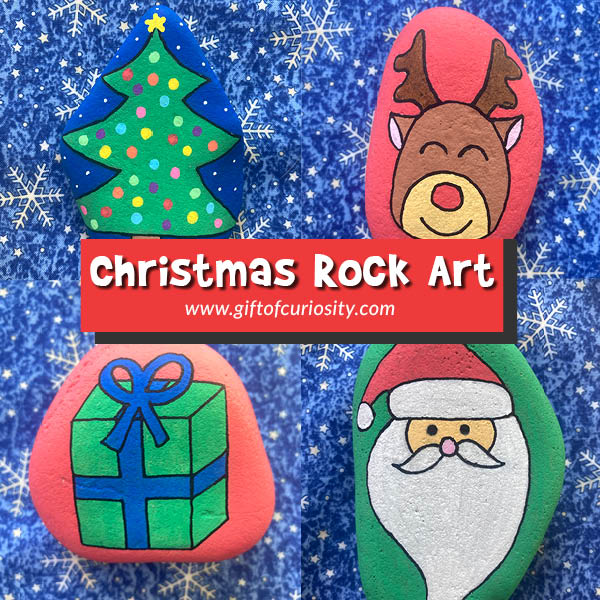
And today I’m sharing a tutorial on how to make some beautiful Christmas rock art. These fun little pieces will be loved by kids and adults alike.
Note: You’ll find more awesome Christmas projects on my Christmas Activities for Kids page.

Materials needed to make Christmas Rock Art
To make these Christmas rock art pieces, you will need the following materials:
- Rocks (ideally with a flat surface)
- Pencil with eraser
- Black pen (such as paint marker, jelly roll pen, or permanent marker)
- Paint (preferably acrylic paint)
- Small paint brushes
- Sealant
A few quick notes about the rocks:
- Flat rocks can be purchased online at retailers like Amazon. Be sure they are not pre-coated or sealed.
- You can also look for rocks outdoors, but please do not remove rocks from protected natural areas.
- I generally do not recommend that you purchase the smooth stones from craft stores, as they often come with a coating on them, which will prevent your paint from adhering well to the rock.
- Before starting your project, make sure your rocks are clean, dry, and free from any debris.
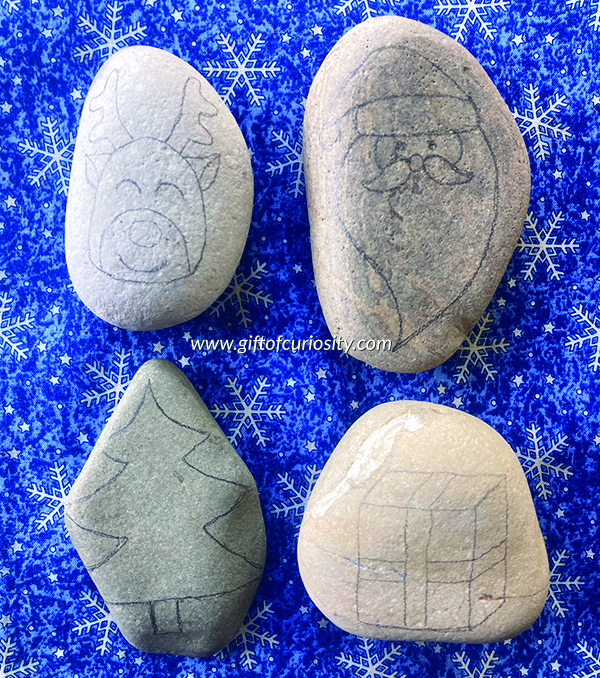
Step 1:
- For the reindeer, use a pencil to draw an oval shape for the reindeer’s head. Add an arch near the bottom for the snout. Add a circle for his nose and lines for his eyes and mouth. Draw two ears on the sides. On top of the head, draw antlers.
- For the Santa, use a pencil to draw the outline of the beard, face, nose, mustache, and hat.
- For the Christmas tree, use a pencil to draw the outline of the tree. Add a trunk underneath.
- For the present, use a pencil to draw a square. Add diagonal lines starting at the corners of the box to give the box dimension. Add lines to make the ribbon on the box.
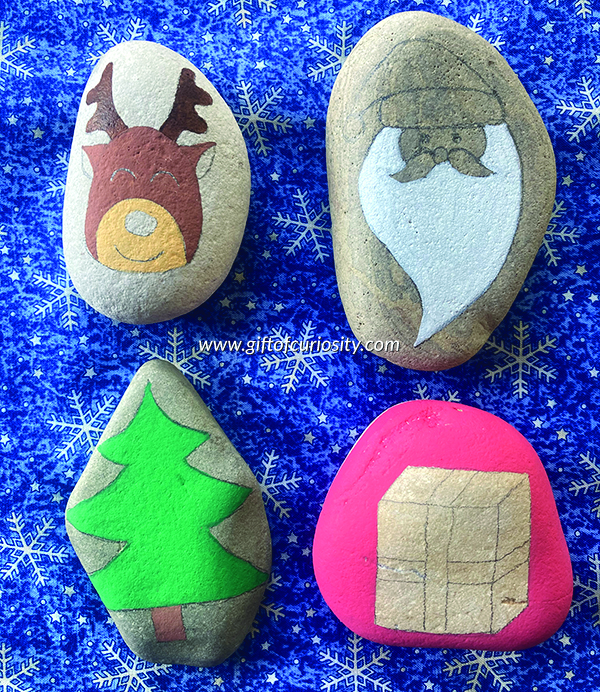
Step 2:
- For the reindeer, paint the antlers dark brown, the face and ears medium brown, and the snout a lighter brown or beige color.
- For the Santa, paint the beard white.
- For the Christmas tree, paint the tree green and the trunk brown.
- For the present, paint the background red.
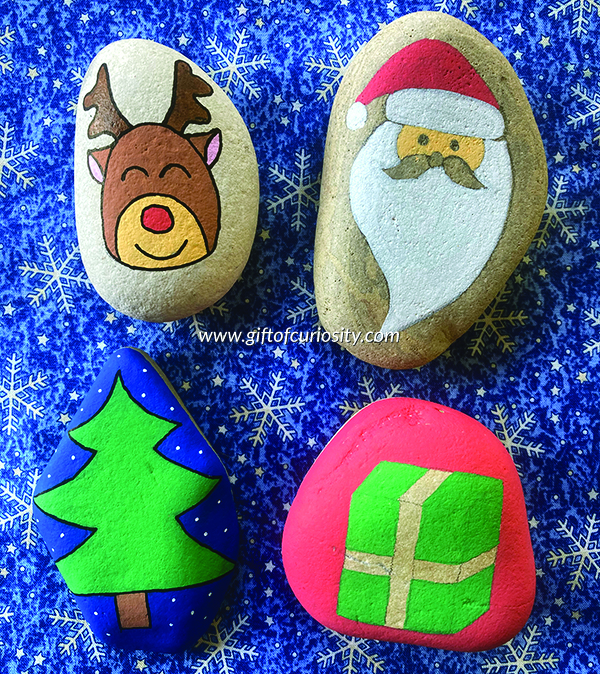
Step 3:
- For the reindeer, paint the insides of the ears pink and the nose red, then outline the details in black.
- For the Santa, paint the face with a flesh color. Then paint the brim and snowball on the hat white and the main part of the hat red.
- For the Christmas tree, paint the background blue and add small white dots for snowflakes. Outline the details of the tree in black.
- For the present, paint the box green.
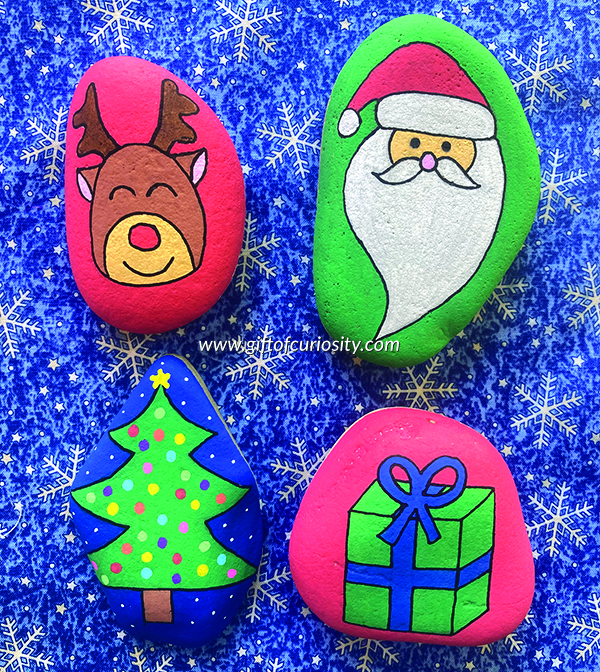
Step 4:
- For the reindeer, paint the background red.
- For the Santa, paint his nose pink, and his mustache white. Then paint the background green before outlining the details in black.
- For the Christmas tree, add a yellow star at the top and a variety of colored circles on the tree to represent ornaments.
- For the present, paint the ribbon blue. Add two big blue loops on top of the present to represent a bow and two blue ties at the bottom of the bow. Outline the details in black.
When you are done, I recommend you spray your rocks with sealant as the final step. This will add a nice sheen to your rock and protect your paint. I recommend the Krylon brand of sealant. You can choose either a matte or glossy finish, depending on your preference.
If you choose, you may glue jewels or other small objects to your rock. If you decide to do this, I recommend you use the E6000 brand of glue. (Note: it is important to seal your rock with sealant prior to gluing items!)
Rock art can be very relaxing and fun. Let your imagination run wild!
More Christmas resources
More Christmas crafts from Gift of Curiosity:
- Washi tape Christmas trees
- Q-tip painted Christmas tree
- Paper plate reindeer craft
- Christmas tree ribbon craft
- Cinnamon Christmas ornaments
- Fine motor Christmas craft
- Gingerbread man craft
For more Christmas activities your kids will love, see my Christmas Activities for Kids page and my Christmas Activities for Kids Pinterest board.
I am proud to say that this post was featured by Twinkl in their online article Christmas Crafts with Twinkl.